GoDaddy is a prominent hosting provider and has email services that are widely used. However, due to the advanced features offered by Outlook, users often want to shift from GoDaddy emails. Outlook provides them with several benefits, such as greater security and productivity. To do this, you’ll have to export GoDaddy email (Webmail) to PST.
If you want to learn how to upload emails from GoDaddy to PST with Outlook, this article will be your step-by-step guide. Follow it diligently to see how to export GoDaddy email to Outlook PST swiftly and smoothly.
Why do Users Export GoDaddy Email to Outlook PST?
There are so many reasons that explain why there’s a need to save emails to PST on your computer. Some of those include:
- Outlook PST files prevent unauthorized users from accessing the data.
- Compatible with email clients, such as Outlook.
- PST files are easily portable from one device to another.
- Export emails to PST files to lower the workload on the GoDaddy servers.
- With a PST file, you can access your emails offline.
- PST files store a secure backup of GoDaddy emails.
- Make space for more data by exporting old emails to PST files.
- Preserve old emails locally for legal and compliance purposes.
How to Export GoDaddy Email (Webmail) to PST File?
In this method, we’re going to use Outlook application to export the emails to a PST file. What you need to execute this method is the credentials of your GoDaddy email account and the Outlook application installed on your device.
Part 1 - Connect Outlook with a GoDaddy email account
Start the process by configuring GoDaddy email account in the Outlook application. Follow the steps below:
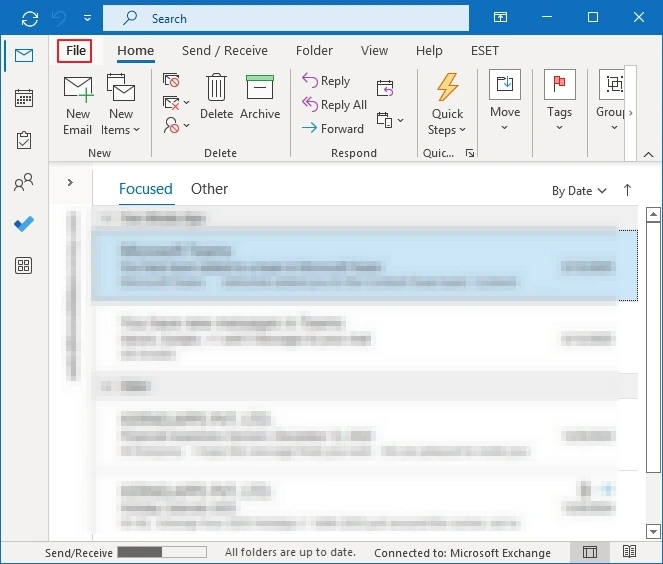
Step 1: Open Outlook and go to File tab.
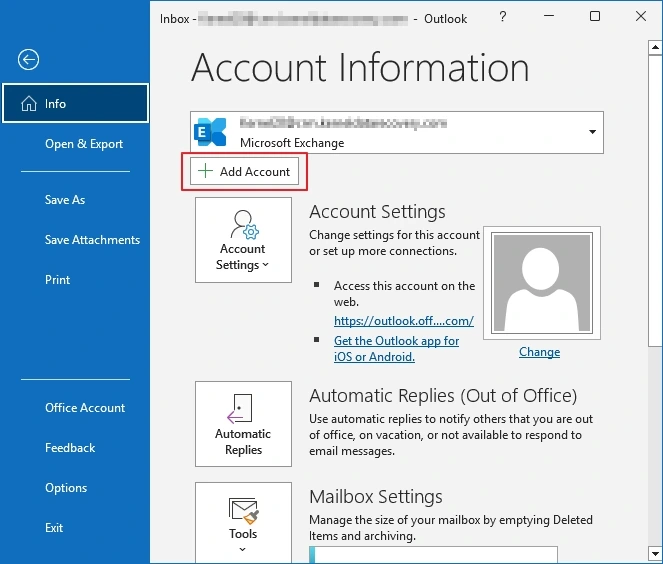
Step 2: Click on Add Account and in the next screen, enter your GoDaddy email address.
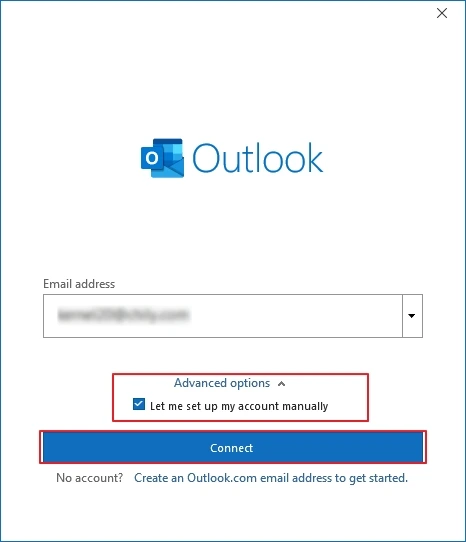
Step 3: Click on the Advanced options dropdown and select “Let me set up my account manually.” Click Connect.
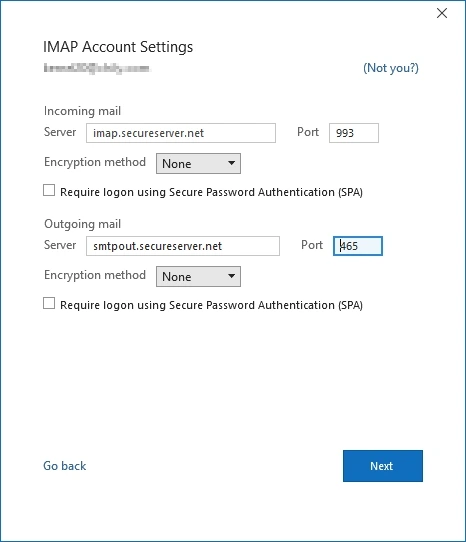
Step 4: Select IMAP in the next screen and adjust the IMAP server settings.
Step 5: Enter the password and press Connect to finish the account configuration.

All the emails will be visible in the Outlook application. Let’s proceed to next step.
Part 2 - Export GoDaddy emails after Connecting with Outlook
Now that the account is set up, let’s see how to export GoDaddy email to PST:
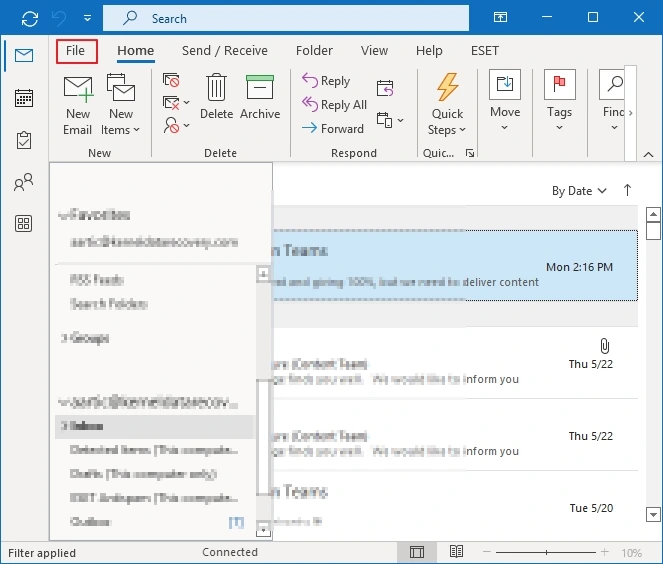
Step 1: Open Outlook and go to File tab.
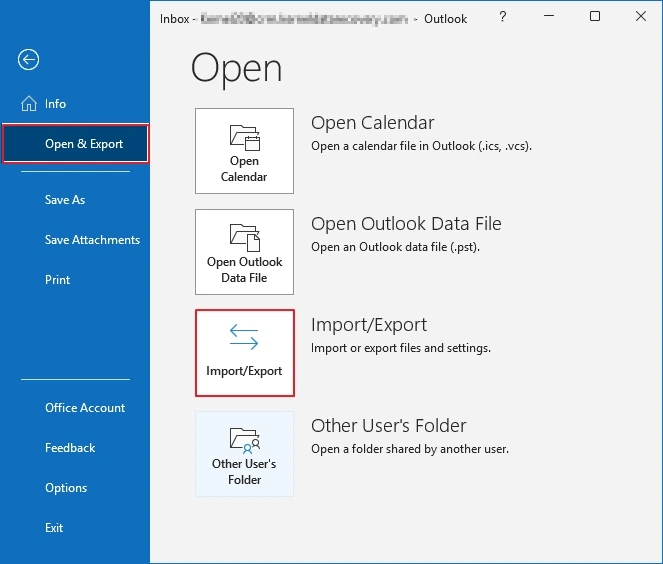
Step 2: Tap Open & Export and then Import/Export.
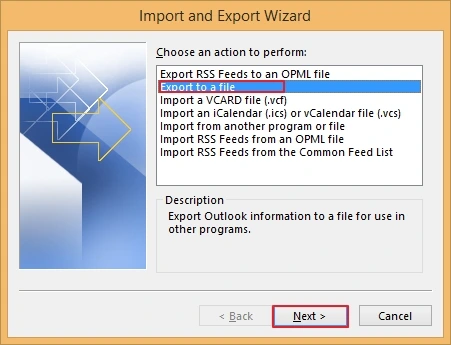
Step 3: From the options, select Export to a file and hit the Next button.
Step 4: Choose Outlook Data File (.pst) and then Next.

Step 5: Select the mailbox folders and click Next.
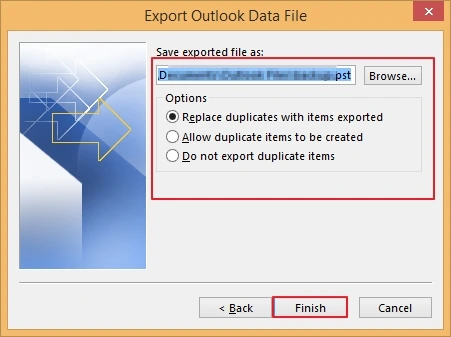
Step 6: Define a location from your computer to save the PST file and click Finish.
Note - With the manual method to export GoDaddy emails, you might have to spend hours when there are too many emails. The process is vulnerable to errors, especially when you’re not tech-savvy. Moreover, there is also a risk of induced corruption in the PST files. So, how do you export GoDaddy email to PST in bulk?
Recommended Method to Export GoDaddy Email to PST?
To avoid the shortcomings of the manual method, use a professional tool that offers risk-free data export from GoDaddy to PST. Kernel GoDaddy Email Backup is a suitable tool that you can consider. It allows you to save GoDaddy emails to PST, MSG, EML, and other file formats. Export data while preserving its integrity and hierarchy with the software's easy-to-use interface.
Steps to Export GoDaddy Email to PST in Bulk
Here’s how to transfer GoDaddy emails to Outlook PST using the GoDaddy email backup tool:
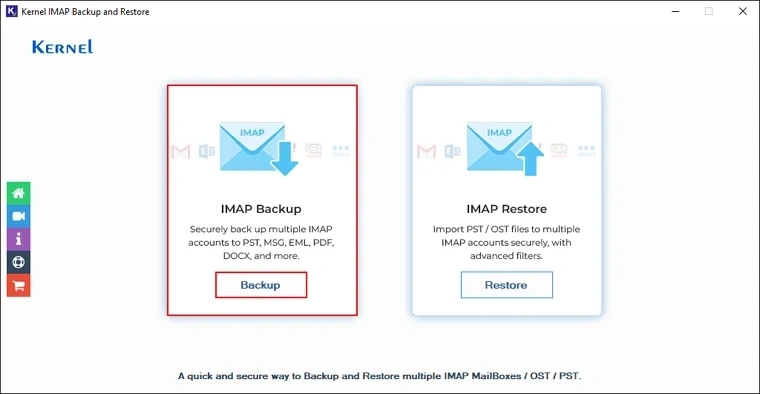
Step 1: Launch the software and click the Backup.
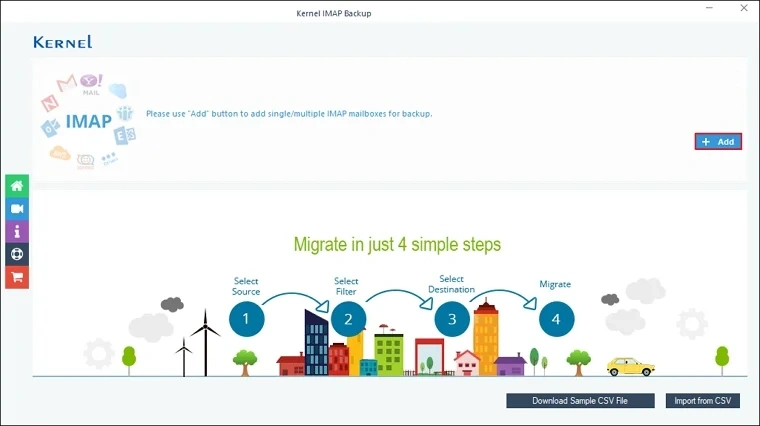
Step 2: Click Add to connect the GoDaddy email account.
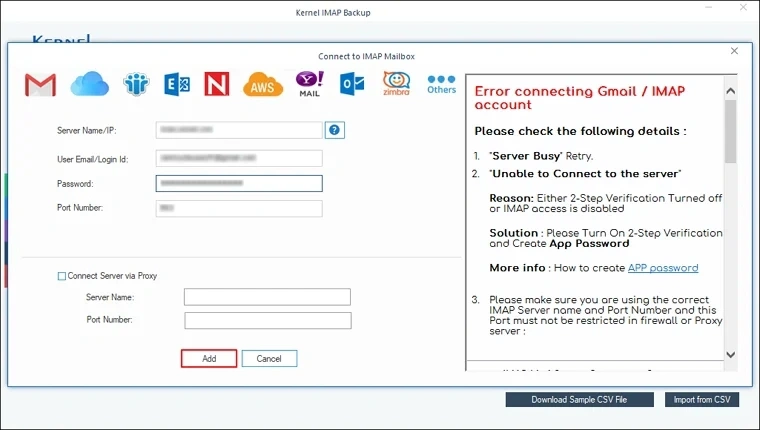
Step 3: Provide the required credentials Server Name/IP, User Email/Login Id, Password, and Port Number. Click Add.
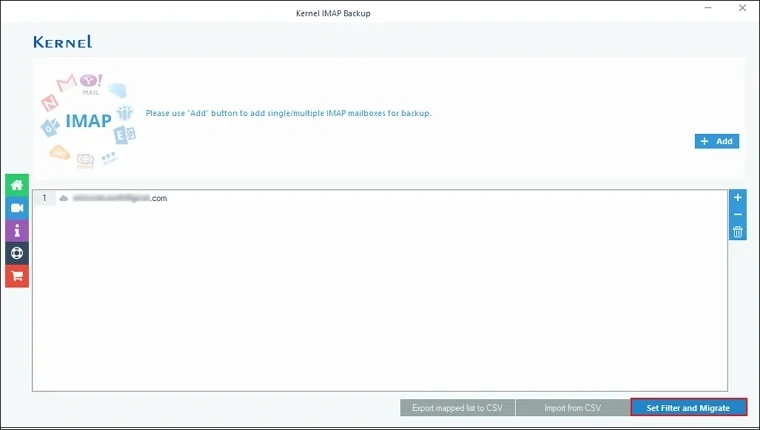
Step 4: Click the 'Set Filter and Migrate' option to proceed.
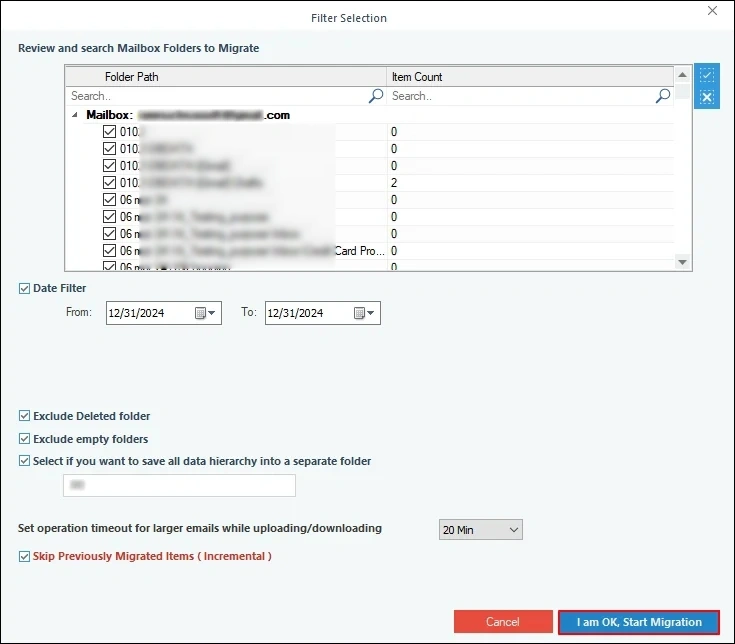
Step 5: In the Filter Selection window, apply filters.
Click I am OK, Start Migration.
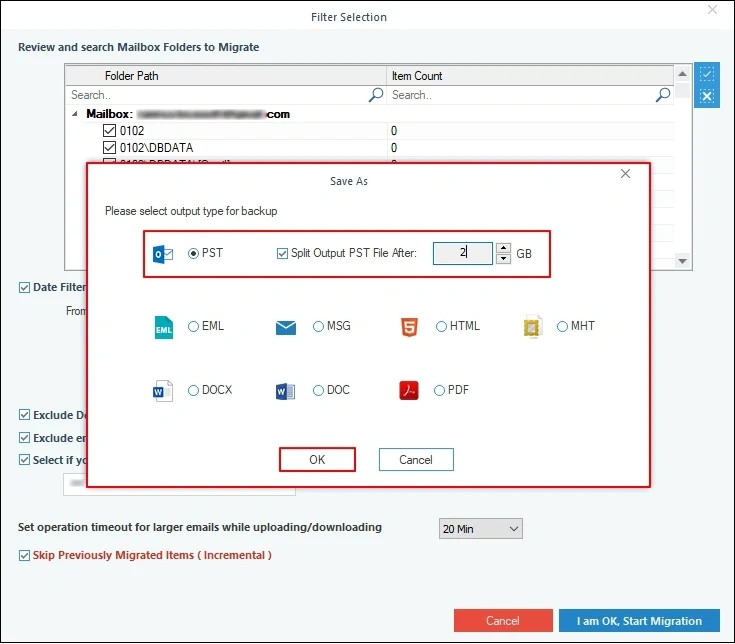
Step 6: Select PST file as the output type and check Split Output PST File After if you want to create multiple PST files and click OK.
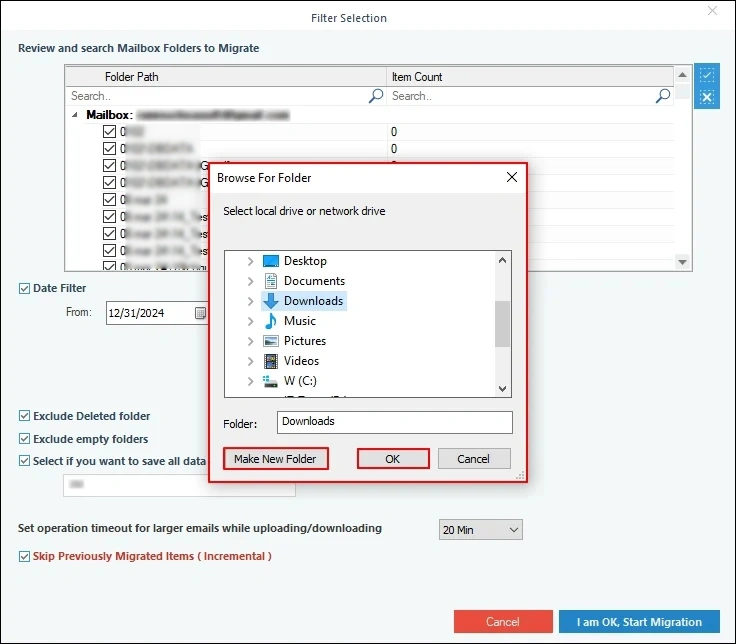
Step 7: Provide a destination from the local machine to save the exported file and click OK.
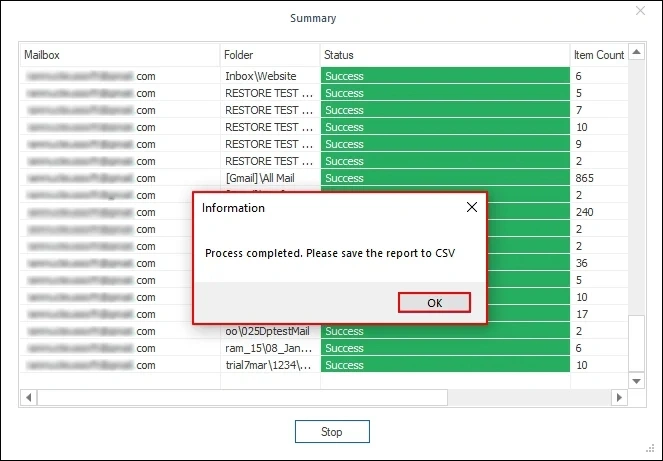
Step 8: After the completion, the software will pop up with "Process completed. Please save the report to CSV" message and click OK.
Final Thoughts
Use the methods mentioned above to export GoDaddy email to PST with or without Outlook installed on your device. Pick the method that suits your business requirements. However, the manual approach is often time-consuming and has chances of data loss.
For best results and zero data loss, use the recommended GoDaddy Imap backup tool and export GoDaddy emails to Outlook PST and other file formats.
Frequently Asked Questions
Q. Can I export inbox folder from the GoDaddy mailbox?
Ans. Yes, you can. After configuring GoDaddy account in Outlook, when you export data to a PST file, on the screen where you select folders, mark the Inbox checkbox. This will export the Inbox email data only.
Q. Does the tool suggested above help export GoDaddy emails to a PDF file?
Ans. Yes, the Kernel GoDaddy Email backup tool allows you to export your emails to a PDF file. Additionally, you can use the tool to export mailboxes to MSG, EML, HTML, and other file formats.

Download GoDaddy emails, attachments, outbox, sent items, and more to hard drive